PCA 从裸机自动化部署 Docker 环境 (PXE + Cloud-init + Ansible)
pxe cloud-init ansible
本实验旨在通过 PXE(Preboot eXecution Environment)、Cloud-Init 和 Ansible 的集成,构建一个高效、自动化的系统部署与配置流程,用于在裸机或虚拟机上实现 Rocky Linux 10.0 的无人值守安装和后续配置管理。整个流程涵盖了从网络引导到操作系统安装,再到动态配置和软件部署的全自动化工作流,适用于快速部署服务器集群或批量配置环境的场景。
PCA(PXE + Cloud-init + Ansible)
自动化操作系统安装:通过 PXE 实现 Rocky Linux 10.0 的网络引导和无人值守安装,基于 Kickstart 配置文件实现标准化的系统部署。
动态初始化配置:利用 Cloud-Init 的 NoCloud 数据源,通过自定义 HTTP 元数据服务器为每台机器动态分配主机名、IP 地址和其他初始化配置。
高级配置管理:通过 Ansible 自动化工具,完成系统后续配置,包括设置软件仓库、安装 Docker 容器环境等,确保系统达到预期的生产状态。
实验环境
操作系统:Alpine Linux v3.22,运行在 PXE 服务器上,内核版本为 6.12.51。
PXE 服务器的网络配置:
- eth0 接口(IP: 192.168.200.139/24)用于外部网络通信,配置了 NAT 转发以支持客户端访问外部网络。
- eth1 接口(IP: 10.33.1.1/16)用于服务 PXE 客户端。
说明:部分脚本由 AI 生成,未经严格测试,可能存在未知错误,仅限实验环境使用,切勿直接用于生产环境。
构建 Alpine PXE 环境
操作系统版本(来源于 /etc/os-release 文件和 uname -a 命令):
NAME="Alpine Linux"
ID=alpine
VERSION_ID=3.22.2
PRETTY_NAME="Alpine Linux v3.22"
HOME_URL="https://alpinelinux.org/"
BUG_REPORT_URL="https://gitlab.alpinelinux.org/alpine/aports/-/issues"
Linux pxe-server 6.12.51-0-virt #1-Alpine SMP PREEMPT_DYNAMIC 2025-10-07 15:12:03 x86_64 Linux
网络信息:
1: lo: <LOOPBACK,UP,LOWER_UP> mtu 65536 qdisc noqueue state UNKNOWN qlen 1000
    link/loopback 00:00:00:00:00:00 brd 00:00:00:00:00:00
    inet 127.0.0.1/8 scope host lo
       valid_lft forever preferred_lft forever
    inet6 ::1/128 scope host
       valid_lft forever preferred_lft forever

2: eth0: <BROADCAST,MULTICAST,UP,LOWER_UP> mtu 1500 qdisc pfifo_fast state UP qlen 1000
    link/ether 00:0c:29:99:03:b7 brd ff:ff:ff:ff:ff:ff
    inet 192.168.200.139/24 brd 192.168.200.255 scope global eth0
       valid_lft forever preferred_lft forever
    inet6 fe80::20c:29ff:fe99:3b7/64 scope link
       valid_lft forever preferred_lft forever

3: eth1: <BROADCAST,MULTICAST,UP,LOWER_UP> mtu 1500 qdisc pfifo_fast state UP qlen 1000
    link/ether 00:0c:29:99:03:c1 brd ff:ff:ff:ff:ff:ff
    inet 10.33.1.1/16 scope global eth1
       valid_lft forever preferred_lft forever
    inet6 fe80::20c:29ff:fe99:3c1/64 scope link
       valid_lft forever preferred_lft forever
tftp 服务器
更新系统软件包列表,安装 tftpd-hpa 软件包,这是一个功能增强的 TFTP 服务器。
apk add tftp-hpa

rc-service in.tftpd start
rc-update add in.tftpd default
tftpd-hpa 服务默认为开机自启动。
使用文本编辑器 vim 打开配置文件:
vim /etc/conf.d/in.tftpd
将文件内容修改为如下所示。这些设置将使 TFTP 服务器监听所有网络接口的连接,并允许上传新文件(可选)。
# /etc/init.d/in.tftpd

# Path to server files from
# Depending on your application you may have to change this.
INTFTPD_PATH="/pxe/tftp/"
#INTFTPD_PATH="/var/tftp/"
#INTFTPD_PATH="/tftpboot/"
#INTFTPD_PATH="/tftproot/"

# For more options, see in.tftpd(8)
# -R 4096:32767 solves problems with ARC firmware, and obsoletes
# the /proc/sys/net/ipv4/ip_local_port_range hack.
# -s causes $INTFTPD_PATH to be the root of the TFTP tree.
# -l is passed by the init script in addition to these options.
INTFTPD_OPTS="-R 4096:32767 -s ${INTFTPD_PATH} -c -u nobody"
安装 tftpd-hpa 后,如果 /pxe/tftp 目录不存在,则创建该目录。
mkdir -p /pxe/tftp
为了使 TFTP 服务能够管理该目录下的文件,需要将目录的所有者更改为配置文件中指定的 tftp 用户,并赋予适当的读写执行权限。
# 更改目录所有者
chown -R nobody:nobody /pxe/tftp

# 设置目录权限,755 允许所有者读写,其他用户只读
chmod -R 755 /pxe/tftp
注意:有些教程建议使用 777 权限,这会允许任何用户写入,可能带来安全风险。对于大多数应用场景,755 是一个更安全的选择。
若修改了配置文件,应手动重启 tftpd-hpa 服务。
rc-service in.tftpd restart
nginx 服务器
更新软件包列表并安装 nginx 服务。
apk add nginx

rc-service nginx start
rc-update add nginx default
安装成功后会自动启动 Nginx 服务。 nginx 服务默认为开机自启动。
您需要创建一个专门的目录来存放您希望通过 HTTP 提供下载的文件。为了便于管理,我们将其创建在 /srv/http/。
mkdir -p /pxe/http/
为 /pxe/http 目录设置正确的所有权和权限,以确保 Nginx 进程(通常以 www-data 用户身份运行)有权访问这些文件。
# 将目录的所有权递归地赋予 www-data 用户和组
chown -R nginx:nginx /pxe/http

# 确保目录及其中的文件具有正确的读取权限
chmod -R 755 /pxe/http
删除 /etc/nginx/http.d/default.conf 文件
rm -rf /etc/nginx/http.d/default.conf
在 /etc/nginx/http.d/file-server.conf 创建一个新的配置文件。
vim /etc/nginx/http.d/file-server.conf
将以下内容粘贴到您刚刚创建的 file-server 文件中:
server {
    listen 80 default_server;

    location / {
        root /pxe/http/;
        autoindex on;
        autoindex_exact_size off;
        autoindex_localtime on;
		charset utf-8;
        try_files $uri $uri/ =404;
    }

}
在重启服务之前,检查配置文件是否存在语法错误。
nginx -t
如果您看到如下输出,则表示配置正确:
nginx: the configuration file /etc/nginx/nginx.conf syntax is ok
nginx: configuration file /etc/nginx/nginx.conf test is successful
重载 Nginx 服务,以应用所有更改。
rc-service nginx reload
nfs 服务器
安装 NFS 服务器软件包
apk add nfs-utils

rc-service nfs start
rc-update add nfs default
创建一个用于共享的目录,例如 /pxe/nfs:
mkdir -p /pxe/nfs
设置目录权限,确保客户端可以访问(根据需求调整权限):
chown nobody:nobody /pxe/nfs
chmod 755 /pxe/nfs
编辑 NFS 配置文件 /etc/exports,指定共享目录和访问权限:
vim /etc/exports
添加以下内容(根据你的网络和需求调整):
/pxe/nfs 10.33.0.0/16(ro,sync,no_subtree_check)
/pxe/nfs:共享的目录。10.33.0.0/16:允许访问的客户端网络(替换为你的网络范围,例如 192.168.1.* 或特定 IP)。ro:允许读,禁止写。sync:确保数据同步写入。no_subtree_check:禁用子树检查,提高性能。
更新 NFS 导出表:
exportfs -a
kea-dhcp 服务器
更新您的系统软件包列表并安装 Kea DHCPv4 服务器的软件包。
apk add kea-dhcp4

rc-service kea-dhcp4 start
rc-update add kea-dhcp4 default
Kea 的配置文件使用 JSON 格式,默认位于 /etc/kea/kea-dhcp4.conf。我们将备份原始文件并创建一个新的配置。
备份默认配置文件
mv /etc/kea/kea-dhcp4.conf /etc/kea/kea-dhcp4.conf.bak
创建并编辑新的配置文件
vim /etc/kea/kea-dhcp4.conf
将下面的 JSON 配置模板完整地复制并粘贴到文件中。您需要根据您的网络环境修改其中的占位符。
{
    "Dhcp4": {
        "interfaces-config": {
            "interfaces": [ "eth1" ]
        },
        "lease-database": {
            "type": "memfile",
            "persist": true,
            "name": "/var/lib/kea/kea-leases4.csv"
        },
        "client-classes": [
            {
                "name": "PXE_BIOS",
                "test": "option[93].hex == 0x0000",
                "option-data": [
                    {
                        "name": "boot-file-name",
                        "data": "undionly.kpxe"
                    }
                ]
            },
            {
                "name": "PXE_UEFI",
                "test": "option[93].hex == 0x0007 or option[93].hex == 0x0009",
                "option-data": [
                    {
                        "name": "boot-file-name",
                        "data": "ipxe.efi"
                    }
                ]
            }
        ],
        "subnet4": [
            {
            "id": 1,
            "subnet": "10.33.0.0/16",
            "pools": [
                {
                    "pool": "10.33.1.100 - 10.33.1.200"
                }
            ],

            "next-server": "10.33.1.1",

	    	"option-data": [
                {
                    "name": "routers",
                    "data": "10.33.1.1"
                },
                {
                    "name": "domain-name-servers",
                    "data": "223.5.5.5, 223.6.6.6"
                }
            ],


            "valid-lifetime": 4000,
            "renew-timer": 1000,
            "rebind-timer": 2000,

            }
        ],
        "loggers": [
            {
                "name": "kea-dhcp4",
                "output_options": [
                    {
                        "output": "/var/log/kea/kea-dhcp4.log"
                    }
                ],
                "severity": "INFO",
                "debuglevel": 0
            }
        ]
    }
}
如果修改了配置文件,需重启服务以应用更改。
rc-service kea-dhcp4 restart
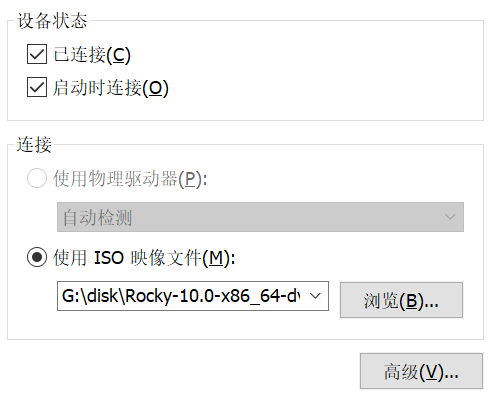
挂载 ISO 镜像
将 ISO 镜像连接到 PXE 服务器,并设置开机自动挂载到 /pxe/http/rocky10.0 文件夹。
创建 /pxe/http/rocky10.0 文件夹
mkdir /pxe/http/rocky10.0
使用 blkid 命令查看该 ISO 设备的是否正常添加。
# blkid

/dev/sr0: BLOCK_SIZE="2048" UUID="2025-05-31-19-44-34-00" LABEL="Rocky-10-0-x86_64-dvd" TYPE="iso9660" PTTYPE="PMBR"
编辑 /etc/fstab 文件在文件末尾添加以下内容:
vim /etc/fstab
/dev/sr0 /pxe/http/rocky10.0 iso9660 loop,ro 0 0
使挂载生效:
mount -a
查看 /pxe/http/rocky10.0 文件夹,检查是否挂载成功:
# ls /pxe/http/rocky10.0/
AppStream                     EULA                          boot
BaseOS                        LICENSE                       extra_files.json
COMMUNITY-CHARTER             RPM-GPG-KEY-Rocky-10          images
EFI                           RPM-GPG-KEY-Rocky-10-Testing  media.repo
配置 boot 文件
将 ISO 镜像中的 vmlinuz 和 initrd.img 文件复制到 /pxe/http/boot 文件夹中。
vmlinuz 和 initrd.img 文件存在于 ISO 中的两个路径下,比对文件的 SHA256 值,两个路径下的文件完全一致:
/images/pxeboot/vmlinuz
/images/pxeboot/initrd.img
/isolinux/vmlinuz
/isolinux/initrd.img
注意:此处的根路径指的是 ISO 文件的根路径,而非系统文件中的根路径,系统文件的根路径为 /pxe/http/rocky10.0/…
创建 /pxe/http/boot 文件夹。
mkdir /pxe/http/boot/ -p
复制文件到 /pxe/http/boot 文件夹中,此处选择复制 /pxe/http/rocky10.0/images/pxeboot 路径中的文件。
cp /pxe/http/rocky10.0/images/pxeboot/vmlinuz /pxe/http/boot/vmlinuz
cp /pxe/http/rocky10.0/images/pxeboot/initrd.img /pxe/http/boot/initrd.img
设置 /pxe/http/boot 文件夹,以及 vmlinuz 和 initrd.img 文件的权限。
chown -R nginx:nginx /pxe/http/boot
配置 iptables 规则
配置 iptables 规则并开启 ip 转发。
安装 iptables 工具和服务。
apk add iptables
清空现有规则
iptables -F
iptables -t nat -F
为 10.33.0.0/16 网段的流量启用 NAT 转发:
iptables -t nat -A POSTROUTING -s 10.33.0.0/16 -o eth0 -j MASQUERADE
配置 FORWARD 规则,允许 eth0 和 eth1 之间的双向流量转发:
iptables -t filter -A FORWARD -i eth0 -o eth1 -j ACCEPT
iptables -t filter -A FORWARD -i eth1 -o eth0 -j ACCEPT
注意:上述配置适用于 filter 表中 FORWARD 链默认策略为 DROP 的情况。Alpine Linux 系统默认策略为 ACCEPT。
保存 iptables 规则
rc-service iptables save
编辑 /etc/conf.d/iptables,进行以下更改:
vim /etc/conf.d/iptables
- 将 SAVE_ON_STOP 设置为 no。
- 将 IPFORWARD 设置为 yes。
修改后的配置文件内容如下:
# /etc/conf.d/iptables

# Location in which iptables initscript will save set rules on
# service shutdown
IPTABLES_SAVE="/etc/iptables/rules-save"

# Options to pass to iptables-save and iptables-restore
SAVE_RESTORE_OPTIONS="-c"

# Save state on stopping iptables
SAVE_ON_STOP="no"

# Enable/disable IPv4 forwarding with the rules
IPFORWARD="yes"
启动 iptables 服务并添加到开机自启动。
rc-service iptables start
rc-update add iptables default
编写 ks 文件
anaconda-ks.cfg 是一个用于 Red Hat 系列 Linux 发行版(如 CentOS、Fedora、RHEL 等)的 Kickstart 配置文件。它是由 Anaconda 安装程序在系统安装完成后自动生成的文件,通常位于 /root 目录下。
这个文件可以作为模板,用于创建自定义的 Kickstart 文件。通过修改 anaconda-ks.cfg,用户可以生成一个新的 Kickstart 文件,用于在其他机器上实现自动化、无交互的系统安装。
以下 anaconda-ks.cfg 是从新安装的 rocky10.0 系统(基于 UEFI)中的 /root/ 路径下读取的。
注意:这个文件是基于 UEFI,不能直接用于 Legacy BIOS,尤其是磁盘部分的配置。
# Generated by Anaconda 40.22.3.26
# Generated by pykickstart v3.52.8
#version=RHEL10
# Use graphical install
graphical

%addon com_redhat_kdump --enable --reserve-mb='auto'

%end

# Keyboard layouts
keyboard --vckeymap=cn --xlayouts='cn'
# System language
lang zh_CN.UTF-8 --addsupport=en_US.UTF-8

# Network information
network  --bootproto=dhcp --device=ens33 --noipv6 --activate

repo --name="AppStream" --baseurl=file:///run/install/repo/AppStream

%packages
@^minimal-environment

%end

# Run the Setup Agent on first boot
firstboot --enable

# Generated using Blivet version 3.10.0
ignoredisk --only-use=sda
# Partition clearing information
clearpart --none --initlabel
# Disk partitioning information
part /boot/efi --fstype="efi" --ondisk=sda --size=1024 --fsoptions="umask=0077,shortname=winnt"
part pv.48 --fstype="lvmpv" --ondisk=sda --size=100350
part /boot --fstype="xfs" --ondisk=sda --size=1024
volgroup rl --pesize=4096 pv.48
logvol / --fstype="xfs" --size=100348 --name=root --vgname=rl

# System timezone
timezone Asia/Shanghai --utc

# Root password
rootpw --iscrypted --allow-ssh $y$j9T$3Ps2KZhmIBuEoqfziQ95h8uB$fs/fRxMH91mIDDBk1pLDYjTtOKHEUG6THsXJOmf1gR2
将该文件作为模板文件进行修改,制作自定义的文件。
将第 6 行的 graphical 命令注释掉(在行首添加 #)。 在第 6 行新增 text 命令。
    4 # Use graphical install
-   5 graphical
+   5 # graphical
+   6 text
    7
原始配置使用图形化界面(GUI)进行安装。注释掉 graphical 并添加 text 命令,将安装程序切换到文本模式(TUI),这在自动化或服务器安装中更常见。
将第 13 行的 keyboard --vckeymap=cn --xlayouts='cn' 修改为 keyboard --vckeymap=cn --xlayouts='us'。
    12 # Keyboard layouts
-   13 keyboard --vckeymap=cn --xlayouts='cn'
+   13 keyboard --vckeymap=cn --xlayouts='us'
    14 # System language
原始配置将 X Window System 键盘布局(xlayouts)设置为 ‘cn’ (中文)。修改后的配置将其更改为 ‘us’ (美国英语),这在服务器(尤其是文本模式)环境中更常用。
将第 15 行的 lang zh_CN.UTF-8 --addsupport=en_US.UTF-8 修改为 lang en_US.UTF-8。
    14 # System language
-   15 lang zh_CN.UTF-8 --addsupport=en_US.UTF-8
+   15 lang en_US.UTF-8
    16
原始配置将系统默认语言设置为 ‘zh_CN.UTF-8’ (简体中文),并额外支持 ‘en_US.UTF-8’。修改后的配置将默认语言直接设置为 ‘en_US.UTF-8’ (美国英语),以确保服务器环境的兼容性和一致性。
将第 20 行的 repo 命令注释掉(在行首添加 #)。 在第 20 行新增 url --url=http://10.33.1.1/rocky10.0。
    19
-   20 repo --name="AppStream" --baseurl=file:///run/install/repo/AppStream
+   20 # repo --name="AppStream" --baseurl=file:///run/install/repo/AppStream
+   21
+   22 url --url=http://10.33.1.1/rocky10.0
    23
原始配置使用本地安装介质中的仓库(file:///run/install/repo/AppStream)。注释掉 repo 并添加 url 命令,指示安装程序从指定的网络地址(http://10.33.1.1/rocky10.0)获取所有安装文件和仓库信息,这是实现 PXE 网络安装的关键。
在 %packages 区域中(第 26 行后)新增 cloud-init 包。
    24 %packages
    25 @^minimal-environment
+   26 cloud-init
    27
    28 %end
在最小化安装(@^minimal-environment)的基础上,额外安装 cloud-init 软件包。cloud-init 用于在系统首次启动时从数据源(如 http 服务器)获取配置并自动执行任务。
将第 31 行的 firstboot --enable 修改为 firstboot --disable。
    30 # Run the Setup Agent on first boot
-   31 firstboot --enable
+   31 firstboot --disable
    32
firstboot --enable 会在系统首次启动时运行一个交互式的设置代理程序(Setup Agent)。在自动化安装中,我们希望系统启动后立即可用,因此使用 firstboot --disable 禁用这个功能。
将第 36 行的 clearpart --none --initlabel 修改为 clearpart --all --initlabel。
    35 # Partition clearing information
-   36 clearpart --none --initlabel
+   36 clearpart --all --initlabel
    37 # Disk partitioning information
clearpart --none 保留磁盘上的现有分区。clearpart --all 指示安装程序在安装前清除磁盘上的所有分区和数据,确保在目标磁盘上进行全新的、干净的安装。
在文件末尾(rootpw 命令之后)添加了一个 %post 脚本块。
... (rootpw line) ...
+
+   %post --log=/root/ks-post.log
+
+   cat << EOF > /etc/cloud/cloud.cfg
+   # The modules that run in the 'init' stage
+   cloud_init_modules:
+     - seed_random
+     - bootcmd
+     - write_files
+     - growpart
+     - resizefs
+     - disk_setup
+     - mounts
+     - set_hostname
+     - update_hostname
+     - update_etc_hosts
+     - ca_certs
+     - rsyslog
+     - users_groups
+     - ssh
+     - set_passwords
+
+   # The modules that run in the 'config' stage
+   cloud_config_modules:
+     - ssh_import_id
+     - locale
+     - rh_subscription
+     - spacewalk
+     - yum_add_repo
+     - ntp
+     - timezone
+     - disable_ec2_metadata
+     - runcmd
+
+   # The modules that run in the 'final' stage
+   cloud_final_modules:
+     - package_update_upgrade_install
+     - write_files_deferred
+     - puppet
+     - chef
+     - ansible
+     - mcollective
+     - salt_minion
+     - reset_rmc
+     - scripts_vendor
+     - scripts_per_once
+     - scripts_per_boot
+     - scripts_per_instance
+     - scripts_user
+     - ssh_authkey_fingerprints
+     - keys_to_console
+     - install_hotplug
+     - phone_home
+     - final_message
+     - power_state_change
+   EOF
+
+   cat << EOF > /etc/cloud/cloud.cfg.d/99_datasource_list.cfg
+   datasource_list: [ NoCloud, None ]
+
+   datasource:
+     NoCloud:
+       seedfrom: http://10.33.1.1:8080/
+   EOF
+
+   %end
新增了 %post 脚本,该脚本在系统安装完成后、首次重启前运行。此脚本用于配置 cloud-init:
- 创建
/etc/cloud/cloud.cfg配置文件,定义cloud-init在不同阶段(init, config, final)运行的模块。 - 创建
/etc/cloud/cloud.cfg.d/99_datasource_list.cfg来指定cloud-init的数据源为NoCloud,并指示它从http://10.33.1.1:8080/获取配置数据(user-data, meta-data)。
在 Kickstart 文件的最后一行添加 reboot 命令。
... (%end of post script) ...
+
+   reboot
添加 reboot 确保安装过程成功结束后,系统自动重启,进入新安装的操作系统环境,这是自动化流程的最后一步。
写入 ks 文件
创建 /pxe/http/config 文件夹,在 /pxe/http/config/anaconda-ks.cfg 创建文件,写入修改后的 anaconda-ks.cfg 完整文件。
mkdir /pxe/http/config -p
vim /pxe/http/config/anaconda-ks.cfg
# Generated by Anaconda 40.22.3.26
# Generated by pykickstart v3.52.8
#version=RHEL10
# Use graphical install
# graphical
text

%addon com_redhat_kdump --enable --reserve-mb='auto'

%end

# Keyboard layouts
keyboard --vckeymap=cn --xlayouts='us'
# System language
lang en_US.UTF-8

# Network information
network  --bootproto=dhcp --device=ens33 --noipv6 --activate

# repo --name="AppStream" --baseurl=file:///run/install/repo/AppStream

url --url=http://10.33.1.1/rocky10.0

%packages
@^minimal-environment
cloud-init

%end

# Run the Setup Agent on first boot
firstboot --disable

# Generated using Blivet version 3.10.0
ignoredisk --only-use=sda
# Partition clearing information
clearpart --all --initlabel
# Disk partitioning information
part /boot/efi --fstype="efi" --ondisk=sda --size=1024 --fsoptions="umask=0077,shortname=winnt"
part pv.48 --fstype="lvmpv" --ondisk=sda --size=100350
part /boot --fstype="xfs" --ondisk=sda --size=1024
volgroup rl --pesize=4096 pv.48
logvol / --fstype="xfs" --size=100348 --name=root --vgname=rl

# System timezone
timezone Asia/Shanghai --utc

# Root password
rootpw --iscrypted --allow-ssh $y$j9T$3Ps2KZhmIBuEoqfziQ95h8uB$fs/fRxMH91mIDDBk1pLDYjTtOKHEUG6THsXJOmf1gR2

%post --log=/root/ks-post.log

cat << EOF > /etc/cloud/cloud.cfg
# The modules that run in the 'init' stage
cloud_init_modules:
  - seed_random
  - bootcmd
  - write_files
  - growpart
  - resizefs
  - disk_setup
  - mounts
  - set_hostname
  - update_hostname
  - update_etc_hosts
  - ca_certs
  - rsyslog
  - users_groups
  - ssh
  - set_passwords

# The modules that run in the 'config' stage
cloud_config_modules:
  - ssh_import_id
  - locale
  - rh_subscription
  - spacewalk
  - yum_add_repo
  - ntp
  - timezone
  - disable_ec2_metadata
  - runcmd

# The modules that run in the 'final' stage
cloud_final_modules:
  - package_update_upgrade_install
  - write_files_deferred
  - puppet
  - chef
  - ansible
  - mcollective
  - salt_minion
  - reset_rmc
  - scripts_vendor
  - scripts_per_once
  - scripts_per_boot
  - scripts_per_instance
  - scripts_user
  - ssh_authkey_fingerprints
  - keys_to_console
  - install_hotplug
  - phone_home
  - final_message
  - power_state_change
EOF

cat << EOF > /etc/cloud/cloud.cfg.d/99_datasource_list.cfg
datasource_list: [ NoCloud, None ]

datasource:
  NoCloud:
    seedfrom: http://10.33.1.1:8080/
EOF

%end

reboot
注意:这个文件是基于 UEFI,不能直接用于 Legacy BIOS,尤其是磁盘部分的配置。
设置 /pxe/http/config 文件夹,以及 anaconda-ks.cfg 文件的权限。
chown -R nginx:nginx /pxe/http/config
编译 ipxe NBP 文件
在开始编译之前,您需要一个安装了必要开发工具的 Linux 环境。如果您使用的是基于 Debian/Ubuntu 的发行版,可以运行以下命令安装所需的依赖包:
apk add build-base perl git xz-dev
在某些地区,GitHub 访问速度可能较慢,可通过以下命令配置 SOCKS5 代理(仅适用于 HTTP 和 HTTPS 协议,不支持 SSH 协议):
git config --global http.proxy "socks5://127.0.0.1:1080"
git config --global https.proxy "socks5://127.0.0.1:1080"
注意:请将 127.0.0.1:1080 替换为实际的代理地址和端口。
从官方仓库克隆 iPXE 的源代码:
cd /root/

git clone https://github.com/ipxe/ipxe.git
切换到源代码目录
cd ipxe/src
在 src 目录下,创建一个名为 boot.ipxe 的文件。这个文件将包含您希望 iPXE 在启动时执行的指令。
编写 boot.ipxe 文件并编译 ipxe NBP 文件。
vim boot.ipxe
这是一个 boot.ipxe 文件的示例,您可以根据自己的需求进行修改:
#!ipxe

dhcp

set server-ip 10.33.1.1

set initrd http://${server-ip}/boot/initrd.img
set vmlinuz http://${server-ip}/boot/vmlinuz
set repo http://${server-ip}/rocky10.0

set ks-config http://${server-ip}/config/anaconda-ks.cfg

kernel ${vmlinuz}
initrd ${initrd}

imgargs vmlinuz \
	initrd=initrd.img \
	ip=dhcp \
	inst.repo=${repo} \
	inst.ks=${ks-config}

boot
在 /root/ipxe/src 路径下创建 install.sh 脚本,在修改 boot.ipxe 文件执行该脚本,自动编译为 NBP 文件并复制到目标位置。
vim install.sh
#!/bin/sh

TARGET=/pxe/tftp

cd /root/ipxe/src/

make bin-x86_64-efi/ipxe.efi EMBED=boot.ipxe -j 2
make bin/undionly.kpxe EMBED=boot.ipxe -j 2

cp -p bin-x86_64-efi/ipxe.efi $TARGET
cp -p bin/undionly.kpxe $TARGET

chown -R nobody:nobody $TARGET
chmod 644 $TARGET/*
为 install.sh 添加可执行权限并执行。
chmod +x install.sh
./install.sh
检查 ipxe NBP 文件是否编译成功,并复制到了目标位置。
# ls -la /pxe/tftp/

..
-rw-r--r--    1 nobody   nobody     1013760 Oct 20 08:47 ipxe.efi
-rw-r--r--    1 nobody   nobody       70569 Oct 20 08:47 undionly.kpxe
cloud-init 元数据服务器
cloud-init 是 Linux 虚拟机和裸机实例在首次启动时进行初始化的行业标准工具。它在系统启动的早期阶段运行,从一个”数据源”(Datasource)获取配置数据,然后根据这些数据来配置系统。
cloud-init 可以自动化处理各种初始设置任务,包括:
- 设置主机名(Hostname)
- 配置网络接口
- 创建用户账户并设置密码
- 添加 SSH 公钥
- 安装软件包
- 运行任意脚本(
runcmd)
这是一个非常棒的自动化部署工作流。您正在使用 cloud-init 的 NoCloud 数据源,配合一个自定义的 Python HTTP 服务器,来实现对裸机(或虚拟机)的动态、自动化的配置。
以下是您提供的内容的优化版本,增加了关于 cloud-init 及其元数据服务器的介绍,并详细说明了您的实现步骤。
什么是 cloud-init?
cloud-init 是 Linux 虚拟机和裸机实例在首次启动时进行初始化的行业标准工具。它在系统启动的早期阶段运行,从一个”数据源”(Datasource)获取配置数据,然后根据这些数据来配置系统。
cloud-init 可以自动化处理各种初始设置任务,包括:
- 设置主机名(Hostname)
- 配置网络接口
- 创建用户账户并设置密码
- 添加 SSH 公钥
- 安装软件包
- 运行任意脚本(
runcmd)
元数据服务器(Metadata Server)就是 cloud-init 用来获取配置数据的”数据源”。
此处创建了一个自定义的元数据服务器,使用 NoCloud 数据源类型,它指示 cloud-init 从一个简单的 HTTP URL(在您的 Kickstart 文件中配置为 http://10.33.1.1:8080/)来获取数据。
这个服务器必须提供至少两个文件:
meta-data:包含实例的唯一信息,如instance-id和local-hostname。user-data:包含#cloud-configYAML 文件,定义了要执行的配置任务(如添加 SSH 密钥、运行命令)。
server.py 脚本就是一个轻量级、智能的元数据服务器。它根据请求的客户端 IP 地址,动态地生成 meta-data 文件,为每台机器提供专属的主机名和 ID。
首先,我们创建 cloud-init 需要的配置数据。我们将所有数据文件存放在 /opt/cloud-init/web/ 目录中,server.py 将从这里提供文件。
mkdir /opt/cloud-init/web/ -p
cd /opt/cloud-init/web/

# 创建所有必需的文件
# vendor-data 和 network-config 在此场景中可以为空,但必须存在
touch user-data meta-data vendor-data network-config
生成一个4096位RSA密钥对,并将私钥保存到 /root/.ssh/ssh_key,公钥保存到 /root/.ssh/ssh_pub
ssh-keygen -t rsa -b 4096 -f /root/.ssh/ssh_key -N ""
生成后,公钥文件默认是 ssh_key.pub,需要重命名为 /root/.ssh/ssh_pub
mv /root/.ssh/ssh_key.pub /root/.ssh/ssh_pub
user-data 是 cloud-init 的核心配置,使用 #cloud-config YAML 格式。
将 user-data 中 ssh_authorized_keys 的 xxx 替换为 ssh_pub 文件中的内容。
vim user-data
#cloud-config
preserve_hostname: false

disable_root: false
ssh_pwauth: false

users:
  - name: root
    lock_passwd: false
    ssh_authorized_keys:
      - xxx

ssh_deletekeys: true
ssh_genkeytypes: ['rsa', 'ecdsa', 'ed225519']

runcmd:
  # 使用 'sh -c' 来执行一个包含 shell 逻辑 (如循环) 的命令
  # 使用 'until' 循环来确保回调成功,防止服务器 (10.33.1.1) 暂时不可达
  # -sf: -s (silent) 安静模式, -f (fail) 在 HTTP 4xx/5xx 错误时返回失败 (非0)
  - ['sh', '-c', 'until curl -sf http://10.33.1.1:8081/ready; do echo "Callback failed, retrying in 5s..."; sleep 5; done']
meta-data 是一个模板文件。server.py 会读取它,并动态替换占位符 <...>。
vim meta-data
instance-id: <instance-id>
local-hostname: <local-hostname>
现在,我们在 /opt/cloud-init/ 目录中创建数据源和管理脚本。
cd /opt/cloud-init/
touch instance.csv server.py generate-kea-config.sh
instance.csv 是所有服务器的清单。server.py 和 generate-kea-config.sh 都会读取此文件。 格式: instance_id,hostname,ip,mac。
vim instance.csv
docker-01,docker-01,10.33.1.101,00:0C:29:66:2C:AF
docker-02,docker-02,10.33.1.102,00:0C:29:FC:03:13
docker-03,docker-03,10.33.1.103,00:0c:29:66:2c:b9
注意:需要将文件中的 MAC 地址替换为客户机网卡实际 MAC 地址。
generate-kea-config.sh 脚本读取 instance.csv 并自动生成 Kea DHCP 的配置文件,为每个 MAC 地址创建静态 IP 预留。
vim generate-kea-config.sh
#!/bin/sh

# --- 配置路径 ---
CSV_FILE="instance.csv"
FINAL_CONFIG="/etc/kea/kea-dhcp4.conf"
# ---

echo "正在生成 Kea 配置文件: $FINAL_CONFIG"

# 1. 将 "头部" 模板硬编码并写入新配置 (覆盖)
cat > "$FINAL_CONFIG" << 'EOF'
{
    "Dhcp4": {
        "interfaces-config": {
            "interfaces": [ "eth1" ]
        },
        "lease-database": {
            "type": "memfile",
            "persist": true,
            "name": "/var/lib/kea/kea-leases4.csv"
        },
        "client-classes": [
            {
                "name": "PXE_BIOS",
                "test": "option[93].hex == 0x0000",
                "option-data": [
                    {
                        "name": "boot-file-name",
                        "data": "undionly.kpxe"
                    }
                ]
            },
            {
                "name": "PXE_UEFI",
                "test": "option[93].hex == 0x0007 or option[93].hex == 0x0009",
                "option-data": [
                    {
                        "name": "boot-file-name",
                        "data": "ipxe.efi"
                    }
                ]
            }
        ],
        "subnet4": [
            {
            "id": 1,
            "subnet": "10.33.0.0/16",
            "pools": [
                {
                    "pool": "10.33.1.100 - 10.33.1.200"
                }
            ],

            "next-server": "10.33.1.1",

	    "option-data": [
                {
                    "name": "routers",
                    "data": "10.33.1.1"
                },
                {
                    "name": "domain-name-servers",
                    "data": "223.5.5.5, 223.6.6.6"
                }
            ],


            "valid-lifetime": 4000,
            "renew-timer": 1000,
            "rebind-timer": 2000,

EOF
# 'EOF' 标志结束

# 2. 运行 awk 命令,从 CSV 生成 reservations 块 (追加)
#    (注意: 我们只使用第3列(IP)和第4列(MAC))
awk -F, '
  BEGIN {
    print "            \"reservations\": ["
  }
  {
    if (NR > 1) {
      print ","
    }
    printf "                {\n"
    printf "                    \"hw-address\": \"%s\",\n", $4
    printf "                    \"ip-address\": \"%s\"\n", $3
    printf "                }"
  }
  END {
    print "\n            ]"
  }
' "$CSV_FILE" >> "$FINAL_CONFIG"

# 3. <--- 错误的多余逗号已被移除 --->
#    (之前这里有一行 echo "," >> "$FINAL_CONFIG")

# 4. 将 "尾部" 模板硬编码 (追加)
#    (这个模板现在紧跟在 awk 生成的 "reservations" 数组后面)
cat >> "$FINAL_CONFIG" << 'EOF'
            }
        ],
        "loggers": [
            {
                "name": "kea-dhcp4",
                "output_options": [
                    {
                        "output": "/var/log/kea/kea-dhcp4.log"
                    }
                ],
                "severity": "INFO",
                "debuglevel": 0
            }
        ]
    }
}
EOF
# 'EOF' 标志结束

echo "配置文件已生成。"

# 5. (重要!) 检查配置并重载服务
echo "正在验证配置..."
if kea-dhcp4 -t "$FINAL_CONFIG" 2>&1 > /dev/null; then
    echo "配置有效。正在重载 kea-dhcp4 服务..."

    # 适用于 Alpine Linux (OpenRC)
    rc-service kea-dhcp4 restart

    echo "服务已重载。"
else
    echo "错误:生成的配置文件无效!Kea 服务未重载。"
    echo "请检查 $FINAL_CONFIG 的语法。"
    exit 1
fi
执行 generate-kea-config.sh 脚本,生成 /etc/kea/kea-dhcp4.conf 配置文件,更新 DHCP 配置,以确保机器在 PXE 引导时能获取到正确的 IP 地址。(请确保脚本有执行权限: chmod +x generate-kea-config.sh)
chmod +x generate-kea-config.sh
./generate-kea-config.sh
server.py 脚本将作为 NoCloud 数据源的 HTTP 服务器。
vim server.py
#!/usr/bin/env python3
import http.server
import socketserver
import csv
import os
from pathlib import Path

PORT = 8080
BIND_ADDR = '10.33.1.1'
DATA_DIR = 'web'  # 修改此路径来改变 user-data、vendor-data 等文件位置
DATA_FILE = 'instance.csv'  # 修改此路径来改变 instance.csv 位置,默认读取当前工作路径

# 加载CSV数据库
def load_instances():
    instances = {}
    if not os.path.exists(DATA_FILE):
        return instances

    try:
        with open(DATA_FILE, 'r') as f:
            reader = csv.DictReader(f, fieldnames=['instance_id', 'hostname', 'ip', 'mac'])
            for row in reader:
                if row and row['ip']:
                    instances[row['ip']] = {
                        'instance_id': row['instance_id'],
                        'hostname': row['hostname'],
                        'mac': row['mac']
                    }
    except Exception as e:
        print(f"Error loading CSV: {e}")

    return instances

INSTANCES = load_instances()

class MetadataHandler(http.server.SimpleHTTPRequestHandler):
    def do_GET(self):
        client_ip = self.client_address[0]

        try:
            if self.path == '/meta-data':
                self.serve_metadata(client_ip)
            elif self.path in ['/vendor-data', '/user-data', '/network-config']:
                self.serve_file(self.path[1:])
            else:
                self.send_error(404)
        except Exception as e:
            print(f"Error: {e}")
            self.send_error(500)

    def serve_metadata(self, client_ip):
        if client_ip not in INSTANCES:
            self.send_error(404, "Instance not found")
            return

        instance = INSTANCES[client_ip]
        meta_file = os.path.join(DATA_DIR, 'meta-data')
        if not os.path.exists(meta_file):
            self.send_error(404, "meta-data file not found")
            return

        try:
            with open(meta_file, 'r') as f:
                content = f.read()

            # 替换占位符
            content = content.replace('<instance-id>', instance['instance_id'])
            content = content.replace('<local-hostname>', instance['hostname'])

            self.send_response(200)
            self.send_header('Content-type', 'text/plain')
            self.send_header('Content-Length', len(content.encode()))
            self.end_headers()
            self.wfile.write(content.encode())
        except Exception as e:
            self.send_error(500)

    def serve_file(self, filename):
        filepath = os.path.join(DATA_DIR, filename)
        if not os.path.exists(filepath):
            self.send_error(404)
            return

        try:
            with open(filepath, 'rb') as f:
                content = f.read()

            self.send_response(200)
            self.send_header('Content-type', 'application/octet-stream')
            self.send_header('Content-Length', len(content))
            self.end_headers()
            self.wfile.write(content)
        except Exception as e:
            self.send_error(500)

    def log_message(self, format, *args):
        print(f"[{self.client_address[0]}] {format % args}")

if __name__ == '__main__':
    with socketserver.TCPServer((BIND_ADDR, PORT), MetadataHandler) as httpd:
        print(f"Server running on {BIND_ADDR}:{PORT}")
        httpd.serve_forever()
为 server.py 脚本设置可执行权限,并执行脚本,运行元数据服务器。
chmod +x server.py
./server.py
ansible
在您的自动化流程中,cloud-init 负责完成最基础的系统设置(主机名、网络、SSH密钥)。一旦机器准备就绪,它就需要一个更强大的工具来执行复杂的软件安装、配置和服务管理。此时可以使用 Ansible 工具。
Ansible 是一个开源的 IT 自动化工具,它可以配置系统、部署软件和编排更高级的 IT 任务(如持续部署或零停机滚动更新)。它使用声明性的 YAML 语言来描述系统应有的状态,并通过 SSH(默认)连接到受管节点来执行这些配置。
为安装 ansible-core 等工具,需启用 Alpine Linux 的社区软件仓库。
编辑 /etc/apk/repositories 文件,查找并取消注释 http://xxx/alpine/v3.22/community 行(移除行首的 #)。
或者,直接用以下内容覆盖文件:
vim /etc/apk/repositories
#/media/cdrom/apks
http://mirrors.tuna.tsinghua.edu.cn/alpine/v3.22/main
http://mirrors.tuna.tsinghua.edu.cn/alpine/v3.22/community
安装 ansible-core 工具
apk add ansible-core
在服务器上,创建 /opt/ansible/ 目录并创建文件。
mkdir /opt/ansible/ -p

cd /opt/ansible/

touch configure_repos.yaml centos_docker_china.yaml rocky10.repo.j2 ready.py
rocky10.repo.j2 是一个 Jinja2 模板文件。
Ansible 使用它来动态生成配置文件。{{ baseurl }} 和 {{ gpgkey }} 是变量,在 configure_repos.yaml 中被定义和传入。这种方式使得配置更加灵活和可维护。
vim rocky10.repo.j2
[rocky10-base]
name=Rocky10 Base Repository
baseurl={{ baseurl }}/BaseOS/$basearch/os/
enabled=1
gpgcheck=1
gpgkey={{ gpgkey }}

[rocky10-appstream]
name=Rocky10 AppStream Repository
baseurl={{ baseurl }}/AppStream/$basearch/os/
enabled=1
gpgcheck=1
gpgkey={{ gpgkey }}
configure_repos.yaml Playbook 负责第一阶段的配置,它首先会移除所有默认的 .repo 文件,然后使用 rocky10.repo.j2 模板生成一个指向阿里云镜像的、干净的配置文件。
vim configure_repos.yaml
---
- name: Configure YUM repositories on Rocky Linux 10
  hosts: centos  # 替换为您的 inventory 主机组
  become: yes
  tasks:
    - name: Remove default Rocky repositories
      file:
        path: "{{ item }}"
        state: absent
      loop:
        - /etc/yum.repos.d/rocky-addons.repo
        - /etc/yum.repos.d/rocky-devel.repo
        - /etc/yum.repos.d/rocky-extras.repo
        - /etc/yum.repos.d/rocky.repo
      notify: Clean DNF cache

    - name: Add rocky10 repository
      vars:
        baseurl: https://mirrors.aliyun.com/rockylinux/10.0  # 替换为实际镜像站点
        gpgkey: https://mirrors.aliyun.com/rockylinux/RPM-GPG-KEY-Rocky-10
      template:
        src: rocky10.repo.j2
        dest: /etc/yum.repos.d/rocky10.repo
        owner: root
        group: root
        mode: '0644'
        backup: yes
      notify: Clean DNF cache

    - name: Update DNF cache
      ansible.builtin.dnf:
        update_cache: yes

  handlers:
    - name: Clean DNF cache
      command: dnf clean all
centos_docker_china.yaml Playbook 负责第二阶段的配置。
首先检查操作系统是否符合要求,以及 Docker 是否已经安装。如果已安装,任务会跳过,不会做任何改变。
如果未安装,它会添加 Docker 的 YUM/DNF 仓库,安装所有必需的软件包。
创建 daemon.json 配置文件,并确保 Docker 服务启动并设置为开机自启。
vim centos_docker_china.yaml
---
- name: 部署 Docker 容器环境
  hosts: centos
  vars:
    # 定义需要检查的软件包列表
    docker_required_packages:
      - yum-utils
      - device-mapper-persistent-data
      - lvm2

    docker_packages:
      - docker-ce
      - docker-ce-cli
      - containerd.io
      - docker-buildx-plugin
      - docker-compose-plugin

  tasks:
    - name: 操作系统信息
      ansible.builtin.debug:
        msg: >-
          操作系统是 {{ ansible_distribution }} 版本是 {{ ansible_distribution_version }}
          {% if ansible_distribution in ['CentOS', 'RedHat', 'Rocky'] %}
          符合要求,准备部署 Docker
          {% else %}
          不符合部署要求,正在结束
          {% endif %}

    - name: 操作系统不符合,结束部署
      ansible.builtin.meta: end_host
      when: ansible_distribution not in ['CentOS', 'RedHat', 'Rocky']


    - name: 获取软件包列表
      ansible.builtin.package_facts:
        manager: auto

    - name: 检查主机是否安装 Docker
      ansible.builtin.set_fact:
        installed_docker_packages: "{{ docker_packages | intersect(ansible_facts.packages.keys()) }}"

    - name: Docker 安装情况
      ansible.builtin.debug:
        var: installed_docker_packages
      when: installed_docker_packages

    - name: Docker 已经安装,结束部署
      ansible.builtin.meta: end_host
      when: installed_docker_packages

    - name: 检查 /etc/yum.repos.d/docker-ce.repo 文件是否存在
      ansible.builtin.stat:
        path: /etc/yum.repos.d/docker-ce.repo
      register: docker_repo_file

    - name: 添加 Docker 软件仓库 (适用于 CentOS/RedHat/Rocky)
      block:

        - name: 确保 yum-utils, device-mapper-persistent-data, lvm2 已安装
          ansible.builtin.yum:
            name: "{{ item }}"
            state: present
          loop: "{{ docker_required_packages }}"

        - name: 下载 Docker YUM 源配置文件
          ansible.builtin.get_url:
            url: https://mirrors.aliyun.com/docker-ce/linux/centos/docker-ce.repo
            dest: /etc/yum.repos.d/docker-ce.repo
            mode: '0644'

        - name: 替换为阿里云镜像地址
          ansible.builtin.replace:
            path: /etc/yum.repos.d/docker-ce.repo
            regexp: 'download.docker.com'
            replace: 'mirrors.aliyun.com/docker-ce'

        - name: 清理 YUM 缓存
          ansible.builtin.command:
            cmd: yum clean all
          changed_when: false

        - name: 更新 YUM 缓存
          ansible.builtin.command:
            cmd: yum makecache
          changed_when: false

        - name: 设置仓库已添加的标记
          ansible.builtin.set_fact:
            docker_repo_added: true

      when: not docker_repo_file.stat.exists

    - name: 安装并启动 Docker
      block:

        - name: CentOS 安装 Docker 软件包
          ansible.builtin.yum:
            name: "{{ item }}"
            state: present
          loop: "{{ docker_packages }}"
          register: docker_install_result

        - name: 确保 /etc/docker 目录存在
          ansible.builtin.file:
            path: /etc/docker
            state: directory
            mode: '0755'

        - name: 更新 /etc/docker/daemon.json 配置文件
          ansible.builtin.copy:
            dest: /etc/docker/daemon.json
            content: |
              {
                "proxies": {
                  "http-proxy": "socks5://192.168.200.1:10808",
                  "https-proxy": "socks5://192.168.200.1:10808",
                  "no-proxy": "localhost,127.0.0.1"
                }
              }
            owner: root
            group: root
            mode: '0644'
          register: docker_config_result

        - name: 如果配置文件发生更改,则重启 Docker
          ansible.builtin.service:
            name: docker
            state: restarted
          when: docker_config_result.changed

        - name: 启动 docker 服务
          ansible.builtin.service:
            name: docker
            state: started
            enabled: true
          when: docker_install_result.changed

      when: docker_repo_file.stat.exists or (docker_repo_added is defined and docker_repo_added)
ready.py 脚本监听一个特定端口(8081),等待新机器通过 cloud-init 发送 /ready 回调请求。
当收到请求时,它会为这台新机器动态生成必要的 Ansible 配置文件(inventory 和 ssh_config),然后按顺序执行预定义的 Ansible Playbook,最后清理临时文件。
vim ready.py
#!/usr/bin/env python3

import os
import sys
import subprocess
import tempfile
import string
import random
from http.server import HTTPServer, BaseHTTPRequestHandler
from pathlib import Path


class ReadyRequestHandler(BaseHTTPRequestHandler):
    """处理 /ready 请求的处理器"""

    def do_GET(self):
        """处理 GET 请求"""
        if self.path == '/ready':
            # 获取请求源 IP
            client_ip = self.client_address[0]
            print(f"[*] 收到来自 {client_ip} 的请求")

            # 生成 SSH 配置
            if self.generate_ssh_config(client_ip):
                # SSH 配置成功,执行 Ansible playbook
                if self.execute_ansible(client_ip):
                    self.send_response(200)
                    self.send_header('Content-type', 'text/plain; charset=utf-8')
                    self.end_headers()
                    self.wfile.write("Configuration successful, Ansible playbooks executed successfully\n".encode('utf-8'))
                else:
                    self.send_response(500)
                    self.send_header('Content-type', 'text/plain; charset=utf-8')
                    self.end_headers()
                    self.wfile.write("Ansible execution failed\n".encode('utf-8'))
            else:
                self.send_response(500)
                self.send_header('Content-type', 'text/plain; charset=utf-8')
                self.end_headers()
                self.wfile.write("SSH configuration generation failed\n".encode('utf-8'))
        else:
            self.send_response(404)
            self.end_headers()

    def generate_ssh_config(self, ip):
        """生成并追加 SSH 配置到 ~/.ssh/config"""
        try:
            # 构建 SSH 配置内容
            ssh_config_content = f"""Host {ip}
    HostName {ip}
    Port 22
    User root
    IdentityFile ~/.ssh/ssh_key
    StrictHostKeyChecking no

"""
            # 确保 ~/.ssh 目录存在
            ssh_dir = Path.home() / '.ssh'
            ssh_dir.mkdir(mode=0o700, exist_ok=True)

            # SSH 配置文件路径
            ssh_config_path = ssh_dir / 'config'

            # 追加配置到文件
            with open(ssh_config_path, 'a') as f:
                f.write(ssh_config_content)

            print(f"[+] SSH 配置已追加到 {ssh_config_path}")
            return True
        except Exception as e:
            print(f"[-] 生成 SSH 配置失败: {e}")
            return False

    def cleanup_ssh_config(self, ip):
        """清理 SSH config 文件中对应 IP 的配置"""
        try:
            ssh_dir = Path.home() / '.ssh'
            ssh_config_path = ssh_dir / 'config'

            if not ssh_config_path.exists():
                print(f"[*] SSH 配置文件不存在: {ssh_config_path}")
                return

            # 读取文件内容
            with open(ssh_config_path, 'r') as f:
                lines = f.readlines()

            # 构建要删除的配置块的标识
            host_marker = f"Host {ip}"

            # 过滤掉对应的配置块
            new_lines = []
            skip_block = False
            for line in lines:
                if line.strip().startswith(f"Host {ip}"):
                    skip_block = True
                    continue
                elif line.strip().startswith("Host ") and skip_block:
                    skip_block = False

                if not skip_block:
                    new_lines.append(line)

            # 写回文件
            with open(ssh_config_path, 'w') as f:
                f.writelines(new_lines)

            print(f"[+] SSH 配置已清理: 移除 Host {ip} 的配置")
        except Exception as e:
            print(f"[-] 清理 SSH 配置失败: {e}")

    def generate_inventory(self, ip):
        """生成 inventory.ini 文件"""
        try:
            # 生成随机文件名
            random_str = ''.join(random.choices(string.ascii_lowercase + string.digits, k=8))
            inventory_name = f"inventory_{random_str}.ini"
            inventory_path = os.path.join(tempfile.gettempdir(), inventory_name)

            # 构建 inventory 内容
            inventory_content = f"""[centos]
{ip}
"""
            # 写入 inventory 文件
            with open(inventory_path, 'w') as f:
                f.write(inventory_content)

            print(f"[+] Inventory 文件已生成: {inventory_path}")
            return inventory_path
        except Exception as e:
            print(f"[-] 生成 inventory 文件失败: {e}")
            return None

    def execute_ansible(self, ip):
        """执行 Ansible playbook"""
        try:
            # 生成 inventory 文件
            inventory_path = self.generate_inventory(ip)
            if not inventory_path:
                return False

            ansible_dir = '/opt/ansible'

            # 切换到 Ansible 目录
            os.chdir(ansible_dir)

            try:
                # 执行第一个 playbook
                print(f"[*] 执行: ansible-playbook -i {inventory_path} configure_repos.yaml")
                result1 = subprocess.run(
                    ['ansible-playbook', '-i', inventory_path, 'configure_repos.yaml'],
                    timeout=300
                )

                if result1.returncode != 0:
                    print(f"[-] configure_repos.yaml 执行失败")
                    return False

                print("[+] configure_repos.yaml 执行成功")

                # 执行第二个 playbook
                print(f"[*] 执行: ansible-playbook -i {inventory_path} centos_docker_china.yaml")
                result2 = subprocess.run(
                    ['ansible-playbook', '-i', inventory_path, 'centos_docker_china.yaml'],
                    timeout=300
                )

                if result2.returncode != 0:
                    print(f"[-] centos_docker_china.yaml 执行失败")
                    return False

                print("[+] centos_docker_china.yaml 执行成功")

                # 执行完成后,清理 SSH config 文件中对应的配置
                self.cleanup_ssh_config(ip)

                return True

            finally:
                # 删除临时的 inventory 文件
                try:
                    os.remove(inventory_path)
                    print(f"[+] 临时文件已删除: {inventory_path}")
                except Exception as e:
                    print(f"[-] 删除临时文件失败: {e}")

        except subprocess.TimeoutExpired:
            print("[-] Ansible 执行超时")
            return False
        except Exception as e:
            print(f"[-] 执行 Ansible 失败: {e}")
            return False

    def log_message(self, format, *args):
        """自定义日志输出"""
        print(f"[*] {format % args}")


def start_server():
    """启动 HTTP 服务器"""
    host = '10.33.1.1'
    port = 8081

    server_address = (host, port)
    httpd = HTTPServer(server_address, ReadyRequestHandler)

    print(f"[*] 服务器启动在 http://{host}:{port}")
    print(f"[*] 等待请求: GET /ready")

    try:
        httpd.serve_forever()
    except KeyboardInterrupt:
        print("\n[*] 服务器已停止")
        httpd.server_close()
        sys.exit(0)


if __name__ == '__main__':
    start_server()
为 ready.py 脚本设置权限,并运行脚本。
chmod +x ready.py
./ready.py
测试
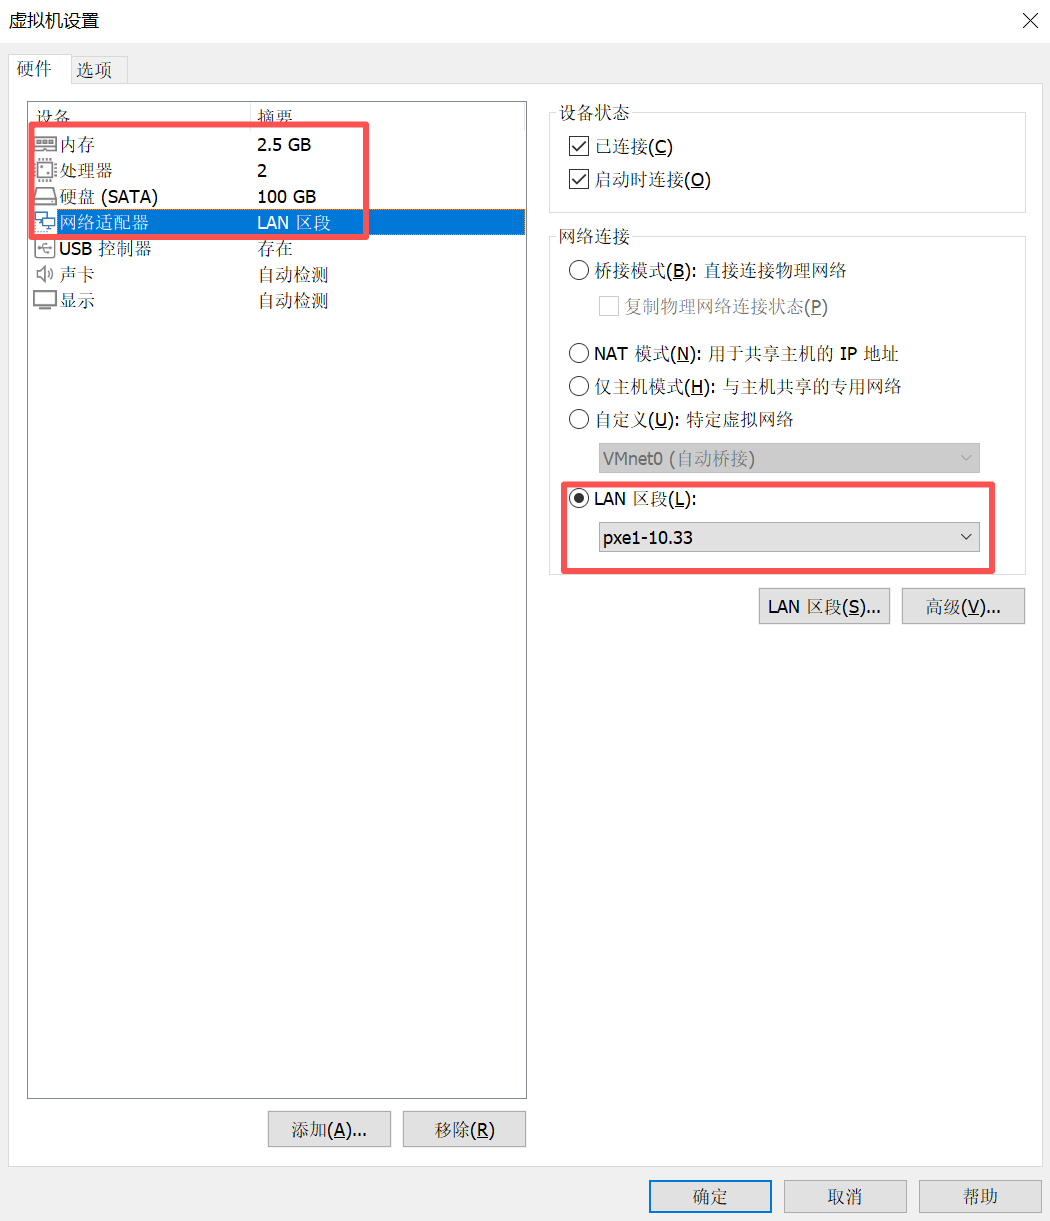
为验证 PXE 自动化部署流程的正确性,需创建一个 VMware 虚拟机,并确保其配置满足以下要求,以保证与 PXE 服务器的兼容性和部署的顺利进行:
- CPU:建议配置至少 2 个 CPU 核心,以确保系统安装和后续配置任务的性能需求。
- 内存:最低 2.5 GB,以支持 Rocky Linux 10.0 的安装和 Cloud-Init、Ansible 等工具的运行。
- 硬盘:分配 100 GB 的磁盘空间,推荐使用精简置备(Thin Provisioning)以节省物理存储,同时确保有足够空间用于操作系统和 Docker 环境。
- 网络适配器:网络适配器必须与 PXE 服务器的 eth1 接口(IP: 10.33.1.1/16)处于同一二层广播域,确保客户端能够通过 DHCP 获取 IP 地址并访问 TFTP 和 HTTP 服务。
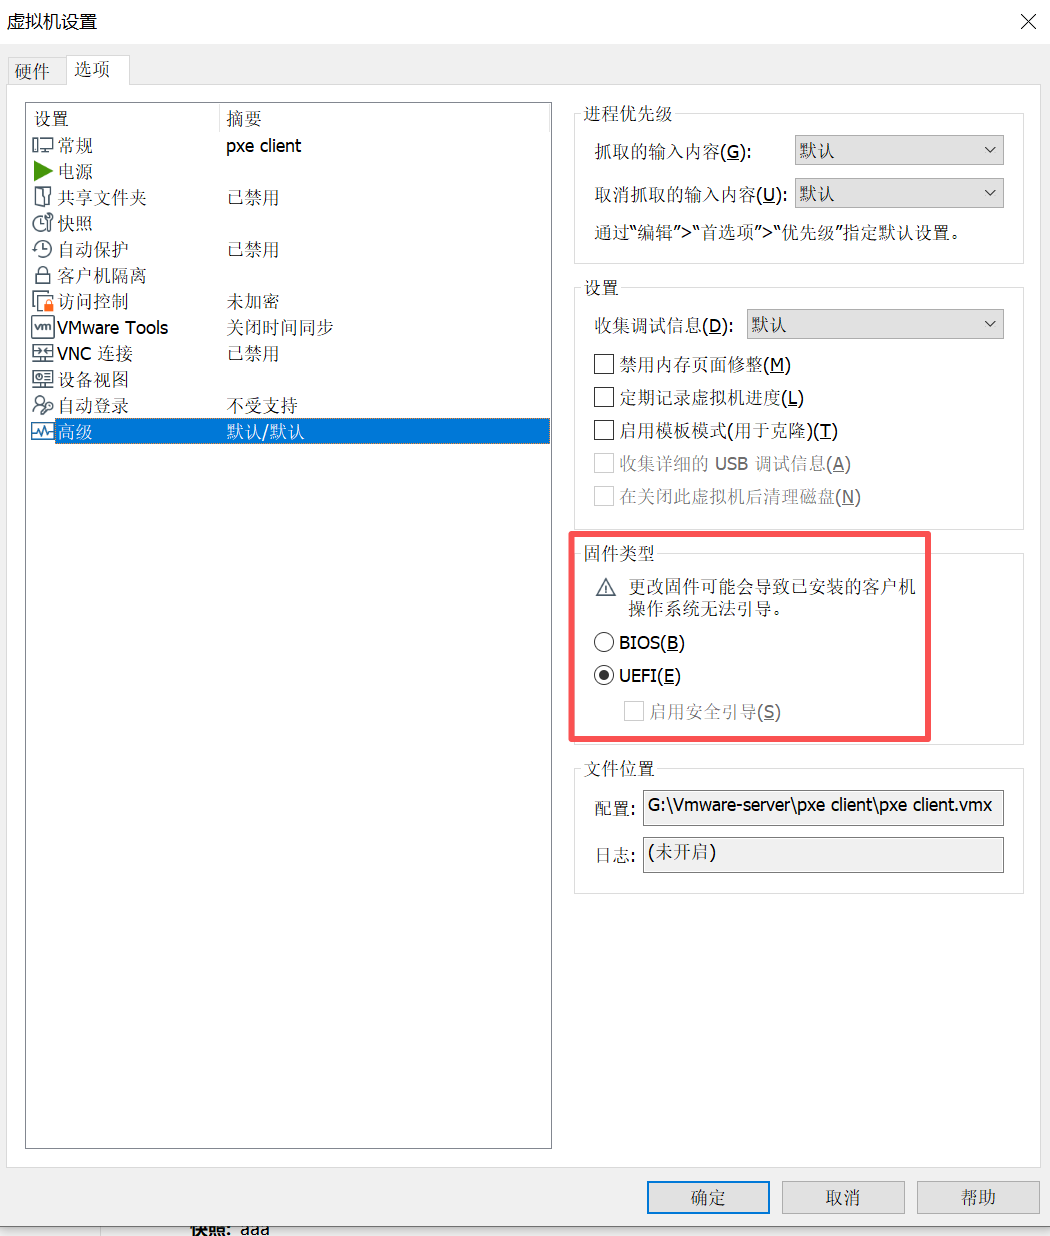
- 固件设置:虚拟机 BIOS 必须配置为 UEFI 模式,因为提供的 Kickstart 文件(anaconda-ks.cfg)针对 UEFI 环境优化,包含 EFI 分区配置(如 /boot/efi)。
开机